Tuesday, October 8, 2019

How to Install Windows 8 on VMware Workstation

How to Install Windows 8 on VMware Workstation | Install Windows 8 in Virtual Machine

By Kwame Last updated October 16, 2019


Here is the brief tutorial on installing Windows 8 on VMware Workstation.
It is better to install Windows 8 virtually before installing on the PC.
Any way this is only developer preview not retail version, so install on
VMware Workstation and try the features virtually.

Here i used VMware Workstation 8, I have no idea whether Windows 8
will install on VMware Workstation 7. I am going diretcly to steps to
follow for installing Windows 8 on VMware Workstation.

Step 1: Select New Virtual Machine from File menu.


Step 2: Click Next on the New Virtual Machine Wizard.


Step 3: Select I will install operating system later and Click Next.


Step 4: Select Guest Operating system = Microsoft Windows, Version = Windows 7 and Click Next to Continue.


Step 5: Type your Virtual Machine Name and Browse for the Storage location, click Next.


Step 6: Specify the Virtual disk storage capacity and Click Next.


Step 7: In the Next window, click on Customize Hardware.


Step 8: Click on CD/DVD and  Browse for the ISO image (Here i used ISO image). Click Close button.


Step 9: Click Finish.


Step 10: Click on Power on this Virtual Machine to power on the Windows 8 VM.


That’s all! The Virtual machine will start boot from ISO image.
So the installation will start to initialize automatically.
Installation of  Windows 8 on VMware Workstation is same like
The installation of Windows 8 on PC.

How to install VirtualBox on Windows All Versions

How to install VirtualBox on Windows 


HOME SERVER

complete VirtualBox setup guide blueprint

written by Kwame October 10, 2019
In this post, we will see how to install VirtualBox on Windows operating system including Windows 7, Windows 8.X, and Windows 10. VirtualBox, originally developed by Sun MicroSystems and now owned by Oracle, can simulate a standalone computer. Each standalone computer (aka virtual appliance) can run its own operating system (guest OS) and is self-contained (delete the appliance and your host system is back to its original state). The appliances can interact with each other and be a part of your home network and will be treated as a separate system. Because of these features and more, VirtualBox allows you to test various operating systems, without making permanent changes to your host OS.


Install VirtualBox on Windows

We recently presented some of the best home server operating systems. VirtualBox would allow you to test these operating systems before you select one. Alternatively, you may actually run your server operating system or media server from your VirtualBox instance 24/7: for example you may run a 24/7 Ubuntu Home, media, or file server guest OS from within your Windows laptop. Sounds exciting? How to run your server from VirtualBox is a topic for another post. For now, let us look at how to install VirtualBox on Windows 8.1. This guide should also work on Windows 7 and Windows 10.

Recommended HTPC / Home Server Builds 2017:
Best Home Theater PC Build 2017 to do it all (Plex, Kodi, NAS, Gaming)
Best Emby Server builds 2018 – Pre-built and DIY options
Medium Budget 4K HTPC Build 2017 for Kodi, Plex and Gaming
Cheap 4K HTPC Build for Kodi, OpenELEC, and LibreELEC 2017
Low Power Home Server Build 2017 for Network File and Media Storage
Best HTPC for Kodi with 4K on a Medium Budget 2017 (~$400)
Energy efficient budget HTPC-NAS combo build 2016
Before you begin, enable Intel VT-x hardware virtualization in BIOS or UEFI firmware. This is required for VirtualBox to run.


INSTALL VIRTUALBOX ON WINDOWS
Recently, we published Ubuntu VirtualBox installation guide. Windows VirtualBox installation is much simpler when compared to Linux.


First, head over the VirtualBox download page, scroll down and find the latest version (currently 4.3.28). Click on the latest version number and then in the following page, scroll down, find the .exe file, and download it to a known location on your Windows computer.

Install VirtualBox on WindowsDownload VirtualBox for Windows
Once VirtualBox Windows installer is downloaded, run the executable file and follow through onscreen instructions to install VirtualBox on Windows. VirtualBox installs virtual network adapters and therefore you may lose network connectivity temporarily during installation.


Install VirtualBox on WindowsInstall VirtualBox on Windows
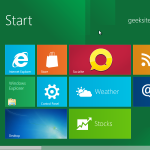
After VirtualBox installation finishes you will have to restart your computer. After reboot, VirtualBox should be available in your apps as shown below. You can now run VirtualBox and create Windows virtual machine with almost any OS you can think of. In a separate guide, we will show you how to install OS on VirtualBox.

VirtualBox on WindowsVirtualBox on Windows
There you have it, Virtual Machine for Windows. You may also use this guide to install VBox on all editions of Windows. Using Windows VirtualBox Extension pack or VirtualBox Guest Additions, you can add several more features to VirtualBox. VMware is another major virtualization software, but VirtualBox has always been my favorite, even-though it has its quirks. Go ahead install VirtualBox on Windows play with almost any OS.

Complete Guide to Setting Up a Home Server on VirtualBox Virtual Machine:
Install VirtualBox - Windows 7/8/10 / Ubuntu/Debian
Install VirtualBox Extension Pack - Linux and Windows Host
Install Guest OS on Virtual Box - Ubuntu Server
Install VirtualBox Guest Additions - Windows Guest / Linux Guest
Update VirtualBox Guest Additions - Windows Guest / Linux Guest
Setup VirtualBox Shared Folder - Windows and Linux
Mount VirtualBox Shared Folder - Windows Guest / Ubuntu Guest
Access USB Drive on VM - Windows and Linux Guest
Configure Home Server on VirtualBox - Ubuntu Server
IPVanish VPN Exclusive 20% Off - only $5.19/month:
VPN Guides
Windows, Android, Ubuntu
Kodi OpenVPN
OSMC on RPi

How to Install VMware Tools on Kali Linux 2019

Step by Step:How to Install VMware Tools on Kali Linux


POSTED BY KWAME APPIAH ON PUBLISHED ON OCT 9, 2019 IN KALI LINUX, KALI LINUX ON VMWARE, UNCATEGORIZED, VMWARE TOOLS, VMWARE WORKSTATION |

We have talked a lot about VMware Tools and benefits of running VMware tools in the VMware virtual machines. No matter, VM is running on ESXi or VMware Workstation. VMware tools are very important for VMware virtual Machine. VMware Tools  Improves Video Resolution, Improves Color Depth, Improved Network adapter performance, Smooth Mouse Experience, Allow Copy and Paste, drag-and-drop the file and provides the ability to take quiesced snapshots of Guest OS. Take a look at my article to understand everything about VMware Tools version. In the previous article, We have discussed in detail about How to download and Install Kali Linux on VMware. Once Kali Linux is installed, it is very important to install VMware tools on Kali Linux. In this article, We will discuss in detail about the  procedure to install VMware Tools on Kali Linux.

VMware Tools includes the below components:

1. VMware Device Drivers – Which provides the drivers for virtual hardware’s including Network adapters. Drivers provide smooth mouse operations, Improve sound, Graphic and performance of the virtual machine.

2. VMware User Process – Provides the ability to copy and paste text between VMware Remote console and Host Operating system. Improves Screen resolution.

3. VMware Services – Handles communication between the guest and host operating system.

How to Install VMware Tools on Kali Linux
In VMware Workstation, Select the Kali Linux VM and Click on “Install VMware Tools” from the VM Menu.

Install VMware Tools on Kali Linux

VMware tools ISO will be mounted to the VM and it will be displayed inside the VM. Right-click the “VMware Tools” CD image and click on Open.

Install VMware Tools on Kali Linux

Right-click “VMwareTools-XXXX.tar.gz” and click on “Extract to”

Install VMware Tools on Kali Linux

Select the Location to extract the VMware Tools ISO image and Click on Select. I have chosen /tmp directory to extract VMware tools files.

Install VMware Tools on Kali Linux

VMware tools ISO is extracted to /tmp directory

Install VMware Tools on Kali Linux


Right-click the Kali Linux desktop and Click on “Open Terminal”.

Install VMware Tools on Kali Linux

Browse towards the /tmp and CD to VMwareTools-XX.X.XX directory.

Install VMware Tools on Kali Linux

CD to the directory “vmware-tools-distrib”

Install VMware Tools on Kali Linux

Install the VMware tools on Kali Linux using the below command

./vmware-install.pl -d

Install VMware Tools on Kali Linux

Installation of VMware tools on Kali Linux is completed successfully.

Install VMware Tools on Kali Linux

Type “Reboot” to reboot the Kali Linux for the changes to take effect.

Install VMware Tools on Kali Linux

That’s it. we are done with the install VMware tools on Kali Linux. I hope this is informative for you. Thanks for Reading!!!. Be social and share it with social media, if you feel worth sharing it.

You may also interested in reading the below Articles:

Investing In Stocks In The Stock Market

Investing In Stocks In The Stock Market


Start with the basics of investing in stocks and go all the way to your first stock market investment.

What you’ll learn?

Learn how to start making money investing in stocks.
Find out what stocks you need to invest in.
Analyze and evaluate a business: conduct quantitative and qualitative analysis (analysis of financial statements).
Read the financial statements of companies.
Determine the price to buy stocks.
Determine when to sell a stock.
Put together a stock portfolio for dividends.
Passively invest in stocks using ETFs.
Choose a brokerage company.
Learn how to cut taxes.
Requirements :
No prior knowledge required to complete the course.

Description :

► This course is designed for anyone who wants to earn extra income by investing in stocks, but does not know where to start.

─ By joining, you will start with the basics of investing in stocks and go all the way to the first investment in the stock market. You will learn how to analyze and evaluate a business, as well as determine which companies need to invest in stocks.

─ Together with you we will study: basic concepts; we will figure out at what price to buy shares and when to sell them; learn to understand the financial statements of companies; conduct quantitative and qualitative analysis; get acquainted with the main principles of reasonable investment; and much more!

─ The course will be taught by Anton Rybakov, a portfolio manager with a valuation of more than $ 20,000.

► After successfully completing the course, you can start making money by investing wisely in stocks from anywhere in the world where there is Internet access.

─ In the process of preparing materials, only those methods and principles were used and implemented that showed a good result from personal experience, eliminating anything worthless that could waste your time.

─ In the course of creating the course, the task was pursued – to understand each element as clearly as possible, so that everyone had the opportunity to study the topic of investment step by step.

► By joining now you will receive:

Lifetime access to this course without any restrictions.
All future updates are absolutely free.
Special support from the course author anytime you need.
A 30-day money back guarantee, so feel free to take the first step to learn how to invest in stocks by simply taking this course!
Who this course is for ?
The course is suitable for beginner investors who want to start with the basics of investing in stocks and get to the first investment in the stock market, having mastered all the necessary set of knowledge, methods and principles.
If you are looking for a course that focuses on day trading or some way to quickly enrich yourself, please do not choose this course, as it does not meet your desires.

Last updated 10/2019
English
Price: 200 $
Udemy course link. Check the course on live!
Download it for free.
Downlod


Saturday, October 5, 2019

How To Download and Install Python 2019


Python Download and Installation Instructions


You may want to print these instructions before proceeding, so that you can refer to them while downloading and installing Python. Or, just keep this document in your browser. You should read each step completely before performing the action that it describes.

This document shows downloading and installing Python 3.7.4 on Windows 10 in Summer 2019. You should download and install the latest version of Python. The current latest (as of Summer 2019) is Python 3.7.4.

Remember that you must install Java, Python, and Eclipse as all 64-bit applications.

Python: Version 3.7.4
The Python download requires about 25 Mb of disk space; keep it on your machine, in case you need to re-install Python. When installed, Python requires about an additional 90 Mb of disk space.

Downloading

Click Python Download.
The following page will appear in your browser.


Click the Windows link (two lines below the Download Python 3.7.4 button). The following page will appear in your browser.


Click on the Download Windows x86-64 executable installer link under the top-left Stable Releases.
The following pop-up window titled Opening python-3.74-amd64.exe will appear.


Click the Save File button.

The file named python-3.7.4-amd64.exe should start downloading into your standard download folder. This file is about 30 Mb so it might take a while to download fully if you are on a slow internet connection (it took me about 10 seconds over a cable modem).

The file should appear as


Move this file to a more permanent location, so that you can install Python (and reinstall it easily later, if necessary).
Feel free to explore this webpage further; if you want to just continue the installation, you can terminate the tab browsing this webpage.
Start the Installing instructions directly below.
Installing
Double-click the icon labeling the file python-3.7.4-amd64.exe.
A Python 3.7.4 (64-bit) Setup pop-up window will appear.


Ensure that the Install launcher for all users (recommended) and the Add Python 3.7 to PATH checkboxes at the bottom are checked.

If the Python Installer finds an earlier version of Python installed on your computer, the Install Now message may instead appear as Upgrade Now (and the checkboxes will not appear).

Highlight the Install Now (or Upgrade Now) message, and then click it.
When run, a User Account Control pop-up window may appear on your screen. I could not capture its image, but it asks, Do you want to allow this app to make changes to your device.

Click the Yes button.
A new Python 3.7.4 (64-bit) Setup pop-up window will appear with a Setup Progress message and a progress bar.


During installation, it will show the various components it is installing and move the progress bar towards completion. Soon, a new Python 3.7.4 (64-bit) Setup pop-up window will appear with a Setup was successfuly message.


Click the Close button.
Python should now be installed.

Verifying
To try to verify installation,
Navigate to the directory C:\Users\Pattis\AppData\Local\Programs\Python\Python37 (or to whatever directory Python was installed: see the pop-up window for Installing step 3).
Double-click the icon/file python.exe.
The following pop-up window will appear.


A pop-up window with the title C:\Users\Pattis\AppData\Local\Programs\Python\Python37\python.exe appears, and inside the window; on the first line is the text Python 3.7.4 ... (notice that it should also say 64 bit). Inside the window, at the bottom left, is the prompt >>>: type exit() to this prompt and press enter to terminate Python.

You should keep the file python-3.7.4.exe somewhere on your computer in case you need to reinstall Python (not likely necessary).

You may now follow the instructions to download and install Java (you should have already installed Java, but if you haven't, it is OK to do so now, so long as you install both Python and Java before you install Eclipse), and then follows the instruction to download and install the Eclipse IDE. Note: you need to download/install Java even if you are using Eclipse only for Python)